Bootstrap a node with Chef Infra
A node is any physical, virtual, or cloud device that Chef Infra Client configures and maintains. Bootstrapping installs Chef Infra Client on a target system and sets up the node to communicate with Chef Infra Server. You can bootstrap a node in two ways:
- Run the
knife bootstrapcommand from a workstation. - Perform an unattended install to bootstrap from the node itself, without requiring SSH or WinRM connectivity.
Requirements
To bootstrap a node with Chef Infra Client 19 or above, you must use Chef Workstation 26 or above.
Bootstrap a node
The knife bootstrap command runs a bootstrap operation that installs Chef Infra Client on a target node.
Before you begin, you need:
- The IP address or FQDN of the target node.
- SSH credentials (username, and password or identity file) for an account with root access on the node.
- The target node’s operating system, if it isn’t Ubuntu (the default distribution used by
knife bootstrap).
To bootstrap a node with Chef Infra Client, run the following:
Run
knife bootstrapfrom your workstation to connect to the target node and install Chef Infra Client.In a command window, enter the following:
knife bootstrap <ADDRESS> -U <USERNAME> --sudo --license-key <LICENSE>Replace:
<ADDRESS>with the IP address or FQDN of the node<USERNAME>with the username used to connect to the node<LICENSE>with your Progress Chef License ID
The
--sudooption elevates privileges using the sudo command on UNIX-based systems.The command SSHs into the target machine, installs the Chef Infra Client executable (if necessary), generates keys, and registers the node with Chef Infra Server.
After the bootstrap operation is complete, verify that the node is recognized by Chef Infra Server. To show only the node that was just bootstrapped, run the following command:
knife client show <NODE_NAME>Replace
<NODE_NAME>with the name of the node that was just bootstrapped. Chef Infra Server returns something similar to:admin: false chef_type: client name: NODE_NAME validator: falseTo show the full list of nodes and workstations registered with Chef Infra Server, run the following command:
knife client listChef Infra Server returns something similar to:
workstation1
workstation2
...
client1
client2
For more information, see the Knife bootstrap documentation.
What the bootstrap operation does
The following diagram shows the stages of the bootstrap operation, and the list below the diagram describes each of those stages in greater detail.
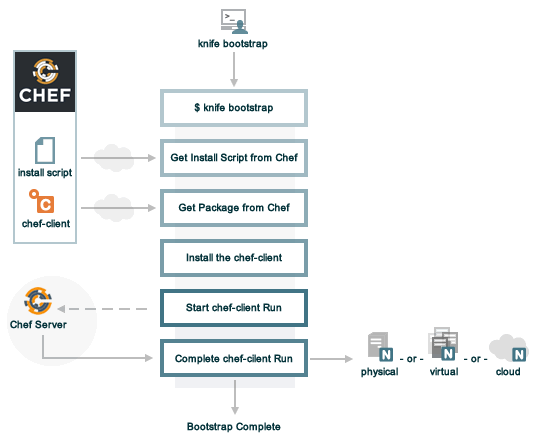
When you run knife bootstrap on a node for the first time, Chef Workstation, Infra Client, and Infra Server handle the following tasks:
Run
knife bootstrapRun the
knife bootstrapsubcommand from a workstation. Include the hostname, IP address, or FQDN of the target node as part of this command. Knife establishes an SSH or WinRM connection with the target system and runs the bootstrap script.By default, the first Chef Infra Client run has an empty run list. You can add a run list to the initial bootstrap operation using the
--run-listoption.Get the install script
A shell script gets the most recent version of the Chef Infra Client install script (
install.shorinstall.ps1) from Chef.Get the Chef Infra Client package
The install script gathers system-specific information, determines the correct package for Chef Infra Client, and downloads that package from Chef’s downloads API.
Install Chef Infra Client
The install script installs Chef Infra Client on the target node using a system-native package (for example,
.rpm,.msi).Start a Chef Infra Client run
When you first run
knife bootstrap, Chef Workstation creates afirst-boot.jsonfile with some initial settings.On UNIX and Linux-based machines, the second shell script executes the
chef-clientbinary with thefirst-boot.jsonfile on the node.On Windows machines, the batch file that’s derived from the
windows-chef-client-msi.erbbootstrap template executes thechef-clientbinary with thefirst-boot.jsonfile on the node.Complete the Chef Infra Client run
The Chef Infra Client run proceeds using HTTPS (port 443) and registers the node with Chef Infra Server.
The knife bootstrap command is a common way to install Chef Infra Client on a node.
The default for this approach assumes that a node can access the Chef website to download the Chef Infra Client package.
The Chef Infra Client installer detects the version of the operating system, then installs the appropriate version of Chef Infra Client and all of its dependencies using a single command. Dependencies include an embedded version of Ruby, OpenSSL, parsers, libraries, and command line utilities.
The Chef Infra Client installer puts everything into a unique directory (/opt/chef/) so that Chef Infra Client doesn’t interfere with other applications running on the target machine.
After installation, Chef Infra Client requires a few more configuration steps before it can perform its first run on a node.
Validatorless bootstrapping
Validatorless bootstrapping generates a key for each node, which is then transferred to the new node and used to authenticate with Chef Infra Server instead of relying on a shared validator key.
By default, the Chef Infra bootstrap process is validatorless and is the recommended way to authenticate new nodes with Chef Infra Server.
The legacy Chef Infra validator-based node bootstrapping process depended on using a shared validator key throughout an organization to authenticate new nodes with Chef Infra Server.
Shortcomings of the legacy validator process include:
- All users share the same key for bootstrapping new systems.
- Key sharing makes key rotation difficult if the key is compromised or if an employee leaves the organization.
If you receive a warning during a bootstrap that a validator key is in use, remove the configuration for this legacy bootstrap mode. Edit your config.rb (knife.rb) file and remove any validation_key or validation_client_name entries.
Bootstrap a node with a Chef Vault item
You can bootstrap nodes using a Chef Vault item. This automatically grants access to secrets that are encrypted with Chef Vault at the time that the node is registered with Chef Infra Server and makes secrets available for the first Chef Infra Client run.
chef-vault options
Use the following options with a validatorless bootstrap to specify items that are stored in chef-vault:
--bootstrap-vault-file <VAULT_FILE>The path to a JSON file that contains a list of vaults and items to be updated.
--bootstrap-vault-item <VAULT>:<VAULT_ITEM>A single vault and item to update as
vault:item.--bootstrap-vault-json <VAULT_JSON_STRING>A JSON string that contains a list of vaults and items to be updated.
--bootstrap-vault-json '{ "vault1": \["item1", "item2"\], "vault2": "item2" }'
Examples
The following examples show how to:
- Create a Chef Vault item with two authorized administrators.
- Bootstrap a node using one of the
--bootstrap-vault-*options so the node is added to the permissions list of the specified Chef Vault item.
Create a data bag item
The following example shows how to recreate a data bag item:
echo "{\"password\":\"password_string\"}" > vault-filename.json

cat vault-filename.json
{"password":"password_string"}

knife vault create credentials root \
  --mode client \
  --admins user_1,user_2 \
  --json vault-filename.json
In the above example:
- A Chef Vault item (
credentials:root) is created with the following JSON string:{"password":"password_string"}. - Only the users
user_1anduser_2are authorized to read and manage the Vault item. - Client nodes aren’t added to the permissions list because the
-S/--searchoption wasn’t used when the Vault item was created.
You can see the details of the credentials:root Vault item with the knife vault show command:
knife vault show credentials root  --mode client --print all
admins:
  user_1
  user_2
clients:
id: root
search_query:
password: password_string
The data bag is encrypted, as confirmed by running the knife data bag show command:
knife data bag show credentials root
WARNING: Encrypted data bag detected, but no secret provided for decoding. Displaying encrypted data.
id: root
some:
cipher:  aes-256-cbc
encrypted_data: c7Axnyg+1KDxBPOZdYN9QuIYx6dmSmK70unAQbn12Lygvsv2g9DPJJbueXVh
+yxL
iv: ONoVR7OjPZiAzaqOZ30bjg==
version: 1
Bootstrap with a JSON file
With the existing credentials:root Vault item, bootstrap a new node by creating a JSON file that defines the Vault item and then use the --bootstrap-vault-file to give the new node permissions to the Vault item.
echo "{\"credentials\":\"root\"}" > vault-item.json

knife bootstrap <ADDRESS> \
  --node-name unique_node_name \
  --run-list 'role[group1]' \
  --connection-user <USERNAME> \
  --sudo \
  --bootstrap-vault-file vault-item.json
The client node is added to the Chef Vault item during the bootstrap operation:
knife vault show credentials root --mode client --print all
admins:
  user_1
  user_2
clients:  unique_node_name
id: root
search_query:
password: password_string
Bootstrap with a single Vault item
With the existing credentials:root Vault item, bootstrap a new node by specifying a single Vault item with the --bootstrap-vault-item to give the new node permissions to the Vault item.
knife bootstrap <ADDRESS>  \
  --node-name unique_node_name \
  --run-list 'role[group1]' \
  --connection-user <USERNAME> \
  --sudo \
  --bootstrap-vault-item credentials:root
The bootstrap operation updates the credentials:root Vault item so the unique_node_name client has access.
Previously, only the two admins were authorized to view the content.
When you show the credentials:root Vault item, it shows that new node and the two administrators have access to the Vault item.
knife vault show credentials root --print all
admins:
  user_1
  user_2
clients:  unique_node_name
id: root
search_query: role:stuff
password: password_string
You can verify that the unique_node_name client can decrypt and read the encrypted data bag contents using the embedded knife CLI in the Chef Infra Client package:
sudo /opt/chef/bin/knife vault show credentials root \
  -c /etc/chef/client.rb \
  -M client \
  --print all
admins:
  user_1
  user_2
clients:  unique_node_name
id: root
search_query: role:group1
password: password_string
Bootstrap with a JSON string
With the existing credentials:root Vault item,
bootstrap a new node with the --bootstrap-vault-json to pass in a JSON string that defines the Vault item and gives the new node permissions to the item.
knife bootstrap <ADDRESS> \
  --node-name unique_node_name \
  --run-list 'role[group1]' \
  --connection-user <USERNAME> \
  --sudo \
  --bootstrap-vault-json '{"credentials": "root"}'
When you show the credentials:root Vault item, it shows that new node and the two administrators have access to the Vault item.
knife vault show credentials root -M client --print all
admins:
  user_1
  user_2
clients:  unique_node_name
id: root
search_query:
password: password_string
Unattended bootstrapping
Chef Infra Client can be installed using an unattended bootstrap, which doesn’t require SSH or WinRM connectivity.
This is useful when you want to create machines automatically using environments like AWS Auto Scaling, AWS CloudFormation, Rackspace Auto Scale, and PXE—where tools for attended, single-machine installs like knife bootstrap aren’t practical because someone can’t always be on hand to initiate the bootstrap process.
When using an unattended bootstrap, Chef Infra Client:
- Must be able to authenticate to Chef Infra Server.
- Must be able to configure a run-list.
- May require custom attributes, depending on the cookbooks that are used.
- Must be able to access the
chef-validator.pemfile so that it may create a new identity on Chef Infra Server. - Must have a unique node name; Chef Infra Client uses the FQDN for the host system by default.
You can build Chef Infra Client into an image that starts on boot, or install it using user data or another post-deployment script. The type of image or user data used depends on the platform.
Bootstrapping with user data
The method used to inject a user data script into a server varies depending on the infrastructure platform being used. For example, on AWS you can pass this data in as a text file using the command line.
The following examples demonstrate the process of bootstrapping Windows and Linux nodes.
Example Windows unattended bootstrap PowerShell script
The following example PowerShell script runs an unattended bootstrap on Windows nodes:
## Set host file so the instance knows where to find chef-server
$hosts = "1.2.3.4 hello.example.com"
$file = "C:\Windows\System32\drivers\etc\hosts"
$hosts | Add-Content $file

## Download Chef Infra Client
$clientURL = "https://chefdownload-commercial.chef.io/stable/client/download?" +
  "p=windows&pv=<PLATFORM_VERSION>&m=<ARCHITECTURE>&v=<PRODUCT_VERSION>&license_id=<LICENSE_ID>"
$clientDestination = "C:\chef-client.msi"
Invoke-WebRequest $clientURL -OutFile $clientDestination

## Install the Chef Infra Client
Start-Process msiexec.exe -ArgumentList @(
  '/qn',
  '/lv C:\Windows\Temp\chef-log.txt',
  '/i C:\chef-client.msi',
  'ADDLOCAL="ChefClientFeature,ChefSchTaskFeature,ChefPSModuleFeature"'
) -Wait

## Create first-boot.json
$firstboot = @{
   "run_list" = @("role[base]")
}
Set-Content -Path c:\chef\first-boot.json -Value ($firstboot | ConvertTo-Json -Depth 10)

## Create client.rb
$nodeName = "lab-win-{0}" -f (-join ((65..90) + (97..122) | Get-Random -Count 4 | % {[char]$_}))

$clientrb = @"
chef_server_url        'https://example.com/organizations/org-name'
validation_client_name 'validator'
validation_key         'C:\chef\validator.pem'
node_name              '{0}'
"@ -f $nodeName

Set-Content -Path c:\chef\client.rb -Value $clientrb

## Run Chef
C:\opscode\chef\bin\chef-client.bat -j C:\chef\first-boot.json
Example unattended bootstrap Bash script
The following example script runs an unattended bootstrap on Linux nodes:
#!/bin/bash -xev

# Do some chef pre-work
/bin/mkdir -p /etc/chef
/bin/mkdir -p /var/lib/chef
/bin/mkdir -p /var/log/chef
/bin/mkdir -p /hab

# Setup hosts file correctly
cat >> "/etc/hosts" << EOF
10.0.0.5    compliance-server compliance-server.automate.com
10.0.0.6    infra-server infra-server.automate.com
10.0.0.7    automate-server automate-server.automate.com
EOF

cd /hab

# Install Chef
curl -L https://chefdownload-community.chef.io/install.sh?license_id=<LICENSE_ID> | sudo bash -s -- -P chef-ice
 || error_exit "couldn't install chef"

# Create first-boot.json
cat > "/etc/chef/first-boot.json" << EOF
{
   "run_list" :[
   "role[base]"
   ]
}
EOF

NODE_NAME=node-$(cat /dev/urandom | tr -dc 'a-zA-Z0-9' | fold -w 4 | head -n 1)

# Create client.rb
cat > '/etc/chef/client.rb' << EOF
log_location            STDOUT
chef_server_url         'https://example.com/organizations/org-name'
validation_client_name  'org-name-validator'
validation_key          '/etc/chef/org-validation-key.pem'
node_name               "${NODE_NAME}"
EOF

chef-client -j /etc/chef/first-boot.json
It’s important that settings in the client.rb file—for example chef_server_url and http_proxy—are used to ensure that configuration details are built into the unattended bootstrap process.
Setting the initial run-list
A node’s initial run-list is specified using a JSON file on the host
system. When running Chef Infra Client as an executable, use the -j
option to tell Chef Infra Client which JSON file to use. For example:
chef-client -j /etc/chef/file.json --environment _default
Where:
_defaultis the name of the environment assigned to the node.file.jsonis similar to the following:
{
  "resolver": {
    "nameservers": [ "10.0.0.1" ],
    "search":"int.example.com"
  },
  "run_list": [ "recipe[resolver]" ]
}
Warning
normal attributes.